20 Essential Pressure Washer Maintenance Tips for Long-Lasting Performance
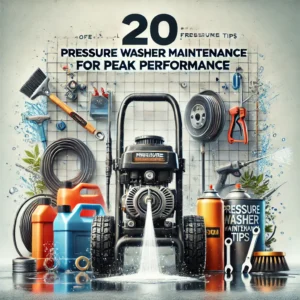
20 Pressure Washer Maintenance Tips for Peak Performance
Pressure washer maintenance is essential for keeping your machine working well and lasting a long time. Without proper care, your pressure washer may break down or lose its cleaning power. Here’s why maintenance matters and how you can do it easily:
- Keeps it running smoothly: Regular care helps your pressure washer work better.
- Saves money: Fixing small problems early stops huge, expensive repairs later.
- Makes it last longer: You can use a well-maintained pressure washer for years.
- Safer to use: Checking your machine helps prevent accidents.
In this guide, we’ll share 20 simple tips to help you take care of your pressure washer like a pro!
Regular Maintenance
1- Check the Oil Level – A Crucial High-Pressure Washer Maintenance Step
Checking the oil level is one of the most important things you can do to keep your high-pressure washer running smoothly. Let’s learn why it’s important and how to do it step-by-step!
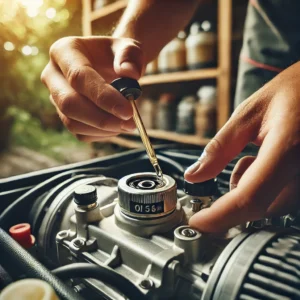
🛢️ What is Oil for in a Pressure Washer? – Pressure Washer Maintenance
The oil keeps the engine and pump parts moving smoothly. It reduces friction and prevents overheating.
❓ Why Check the Oil Level?
- ✅ Prevents Engine Damage: Low oil can cause the engine to break.
- ✅ Keeps the Pump Healthy: Oil protects the pump from overheating.
- ✅ Helps the Machine Last Longer: Clean oil means a longer life for your washer.
- ✅ Saves Money: Fixing a broken engine or pump is expensive!
🛎️ When Should You Check the Oil Level?
- 🧹 Before Every Use: Make it a habit.
- 🛠️ After Every 20 Hours of Use: Check and top up if needed.
- 🗓️ Before Long-Term Storage: Especially before winter storage.
🧰 What You’ll Need:
- 🧤 Gloves (to keep hands clean)
- 🪛 Dipstick or oil level window (comes with the machine)
- 🛢️ The correct oil (check your manual)
- 🧹 Clean rag or paper towel
🛎️ How to Check the Oil Level (Step-by-Step):
- Turn Off the Machine: – Let the engine cool down.
- Locate the Oil Cap: – Find the oil fill cap (check your manual).
- Remove the Dipstick: – Pull it out and wipe it clean with a rag.
- Check the Oil Level: –
- Insert the dipstick without screwing it in.
- Pull it out and look at the oil line.
- 🟢 Good: Oil reaches the “Full” line.
- 🟡 Low: Add more oil.
- Add Oil (If needed): – Use the correct oil type and fill slowly.
- Tighten the Cap: – Close the oil fill cap tightly.
🚨 Safety Tips:
- Use only the oil type recommended by the manufacturer.
- Don’t overfill—too much oil can harm the engine.
- Dispose of old oil properly—never pour it down a drain.
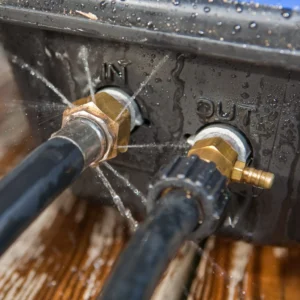
2- Inspect High Pressure Hoses – A Key Pressure Washer Maintenance Task
The hoses in your pressure washer carry water from the pump to the spray gun. Inspecting them regularly keeps your machine safe and strong. Let’s learn how to check them step-by-step!
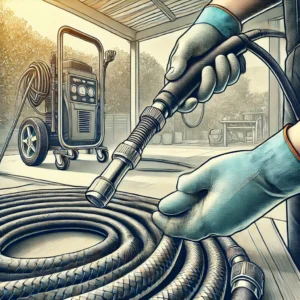
🧵 What Are Pressure Washer Hoses? – Pressure Washer Maintenance
The hose is a long, flexible tube that carries high-pressure water. It connects the pump to the spray gun.
❓ Why Inspect Your Hoses?
- ✅ Prevents Leaks: Cracks in hoses wastewater and lower pressure.
- ✅ Stops Accidents: A broken hose can whip around dangerously.
- ✅ Saves Money: Catching damage early prevents costly repairs.
- ✅ Keeps Pressure Strong: Good hoses give you full cleaning power.
🛎️ When Should You Inspect Your Hoses?
- 🧹 Before Each Use: Quick check for cracks or leaks.
- 🗓️ Every Month: A detailed inspection for wear and tear.
- 🚨 After You Drop the Hose: Check for damage immediately.
🧰 What You’ll Need:
- 🧤 Gloves (for safety)
- 🧹 Soft cloth (for cleaning the hose)
- 🪛 Wrench (for tightening connections)
- 🆕 Replacement hose (if needed)
🛎️ How to Inspect Hoses (Step-by-Step):
- Turn Off and Unplug: – Make sure the machine is off and safe.
- Clean the Hose: – Wipe it with a cloth to remove dirt.
- Look Closely for Damage:
- 🟡 Cracks: Tiny lines or splits.
- 🔴 Bulges: Swollen spots that can burst.
- 🚫 Leaks: Water dripping from the hose.
- Check the Hose Fittings: – Make sure the metal connectors are not rusty or loose.
- Test for Leaks: – Turn on the water without running the engine and look for drips.
- Replace Damaged Hoses: – If you see cracks, bulges, or leaks, get a new hose.
🚨 Safety Tips:
- Never use a hose with cracks or bulges—it could burst under pressure.
- Only buy hoses made for pressure washers.
- Store hoses neatly to avoid kinks and twists.
3- Clean the Water Inlet Filter – Essential Pressure Washer Maintenance
Cleaning the water inlet filter is an important part of taking care of your pressure washer. The filter stops dirt from getting inside and protects the pump. Let’s learn how to clean it step-by-step!
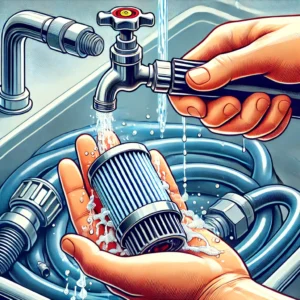
💧 What is the Water Inlet Filter? – Pressure Washer Maintenance
The water inlet filter is a small mesh screen where you connect your garden hose to the pressure washer. It stops dirt, sand, and debris from getting into the pump.
❓ Why Clean the Water Inlet Filter?
- ✅ Keeps Water Flow Strong: Removes clogs so water can flow easily.
- ✅ Protects the Pump: Stops dirt from damaging the pump.
- ✅ Prevents Pressure Problems: Keeps your washer spraying at full power.
- ✅ Saves Money: Prevents costly repairs.
🛎️ When Should You Clean the Water Inlet Filter?
- 🧹 Before Every Use: A quick check for dirt.
- 🧰 After 5–10 Hours of Use: A deeper clean.
- 🚨 If Pressure Drops: Low pressure can mean a clogged filter.
🧰 What You’ll Need:
- 🧤 Gloves (for safety)
- 🪛 Wrench (if needed)
- 🧼 Soft brush or toothbrush
- 💧 Warm, soapy water
- 🧽 Cloth for wiping
🛎️ How to Clean the Water Inlet Filter (Step-by-Step):
- Turn Off the Pressure Washer: – Unplug or switch it off.
- Disconnect the Garden Hose: – Unscrew the hose from the inlet.
- Remove the Water Inlet Filter: – Carefully pull out the mesh filter.
- Inspect the Filter: –
- 🟢 Clean: No dirt or damage.
- 🟡 Dirty: Needs cleaning.
- 🔴 Broken: Replace the filter.
- Wash the Filter: –
- Soak in warm, soapy water.
- Scrub with a soft brush to remove debris.
- Rinse with clean water.
- Dry and Reinstall: – Let the filter dry, then put it back into the inlet.
- Reconnect the Hose: – Attach the garden hose tightly.
🚨 Safety Tips:
- Don’t use sharp tools—they can tear the filter.
- Always turn off the machine before cleaning.
- Replace damaged filters immediately.
4- Inspect Spray Nozzles – A Vital Pressure Washer Maintenance Task
Checking your spray nozzles is an important part of taking care of your pressure washer. Dirty or damaged nozzles can cause problems and make your cleaning harder. Let’s learn why and how to inspect them step-by-step!
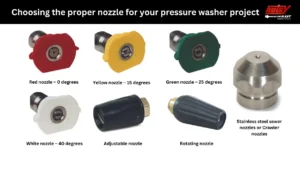
🛠️ What Are Spray Nozzles? – Pressure Washer Maintenance
Spray nozzles are the small tips you attach to the end of the wand. They control how the water sprays. Different colors mean different spray angles:
- 🟥 Red (0°): Strong, for tough stains (use with caution!)
- 🟡 Yellow (15°): Great for concrete and hard surfaces
- 🟢 Green (25°): Good for decks, patios, and driveways
- ⚪ White (40°): Best for cars, windows, and soft surfaces
- ⚫ Black: For soap and detergents (low pressure)
❓ Why Inspect Spray Nozzles?
- ✅ Keeps Pressure Strong: Clogged nozzles reduce waterpower.
- ✅ Prevents Damage: A bad nozzle can hurt the pump.
- ✅ Saves Water: Clean nozzles spray efficiently.
- ✅ Improves Cleaning: Right nozzles make cleaning faster.
🛎️ When Should You Inspect Spray Nozzles?
- 🧹 Before Every Use: Quick check for dirt or clogs.
- 🗓️ After Heavy Use: If you have been cleaning for an extended period.
- 🚨 If You Notice Weak Spray: It may be a nozzle problem.
🧰 What You’ll Need:
- 🧤 Gloves (for safety)
- 🧪 A small wire or paper clip (for cleaning)
- 🧹 Soft brush
- 💧 Bowl of clean water
🛎️ How to Inspect Spray Nozzles (Step-by-Step):
- Turn Off the Machine: – Unplug and release pressure.
- Remove the Nozzle: – Twist it off the wand.
- Look Inside: – Inspect the equipment for dirt, cracks, or signs of wear.
- Clean the Nozzle:
- Use a small wire or paper clip to remove clogs.
- Rinse with clean water.
- Test the Spray: – Attach the nozzle and check the water spray.
- Replace if Damaged: – Replace the nozzle if you find it cracked or worn.
🚨 Safety Tips:
- Never use a damaged nozzle—it can cause injuries or break your machine.
- Always use the correct nozzle for your cleaning job.
- Store nozzles safely to prevent loss or damage.
5- Tighten Connections – A Critical Pressure Washer Maintenance Step
To keep your pressure washer working well, you should always tighten its connections. Loose parts can cause leaks, lower pressure, or even damage your machine. Let’s learn why and how to do it step-by-step!’
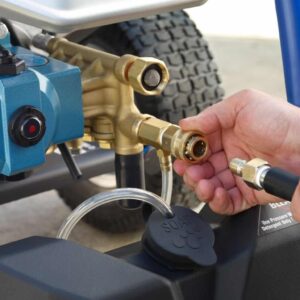
🛠️ What Are Connections? – Pressure Washer Maintenance
Connections are places where parts of your pressure washer join. These include:
- 🧰 Hose fittings – Where the hose connects to the pump.
- 🧪 Spray gun and wand – The parts you hold to spray water.
- 🛢️ Pump connections – Where water flows in and out.
- 🧵 Nozzle fittings – The tip that controls water pressure.
❓ Why Tighten Connections?
- ✅ Prevents Leaks: Loose parts can drip water.
- ✅ Keeps Pressure Strong: Tight fittings stop water from escaping.
- ✅ Stops Damage: Loose parts can break or wear out quickly.
- ✅ Makes Cleaning Safe: Reduces the chance of a hose popping off.
🛎️ When Should You Tighten Connections?
- 🧹 Before Every Use: Check for loose fittings before you start.
- 🛠️ After Moving or Storing: Parts may loosen during transport.
- 🚨 If You See Leaks: Tighten immediately if water drips from joints.
🧰 What You’ll Need:
- 🧤 Gloves (for safety)
- 🪛 Adjustable wrench or pliers
- 🧹 Cloth (to clean around connections)
- 🧰 Teflon tape (for sealing threads if needed)
🛎️ How to Tighten Connections (Step-by-Step):
- Turn Off and Unplug: – Make sure the machine is off and safe.
- Inspect All Connections: – Look for loose fittings or water leaks.
- Tighten Hoses and Fittings: – Use a wrench to tighten them firmly but not too hard.
- Check the Spray Gun and Wand: – Ensure you securely connect them.
- Look at the Nozzle: – Twist the nozzle until it’s snug.
- Test for Leaks: – Turn on the water (without starting the engine) and watch for drips.
- Use Teflon Tape if Needed: – If a connection still leaks, wrap Teflon tape around the threads and tighten again.
🚨 Safety Tips:
- Don’t overtighten! Too much force can crack parts.
- Wear gloves to protect your hands.
- Always follow your user manual for correct connection types.
6- Lubricate Moving Parts – Pressure Washer
Keeping your pressure washer in good shape is easy! One important thing you should do is lubricate the moving parts. This helps the machine last longer and work better. Let’s learn how to do it step-by-step!
🛠️ What Are Moving Parts? – Pressure Washer Maintenance
Moving parts are pieces inside your pressure washer that turn, spin, or slide. These include:
- Pumps – The heart of the washer that pushes water out.
- Hoses and fittings – Parts that twist or connect.
- Spray gun triggers – The part you squeeze to spray water.
🧼 Why Lubricate Moving Parts?
- ✅ Prevents Rust – Keeps metal parts from getting damaged.
- ✅ Reduces Wear and Tear – Stops parts from grinding together.
- ✅ Keeps Things Running Smoothly – Makes your pressure washer work faster and better.
🛢️ What Lubricant Should You Use?
Use high-quality machine oil or pump protector oil. You can find these at hardware stores.
🛎️ How to Lubricate Your Pressure Washer
Follow these simple steps:
- Turn Off the Machine – Safety first! Unplug or switch it off.
- Check the Pump – Add pump oil through the pump’s oil port.
- Spray the Hoses and Fittings – A little lubricant on the connectors keeps them from getting stuck.
- Handle the Spray Gun – Lubricate the trigger if it feels stiff.
- Wipe Off Extra Oil – Use a clean cloth to remove extra oil.
📝 How Often Should You Lubricate?
- After Every 20 Hours of Use – For regular users.
- Before Storing for Winter – To protect parts from damage.
🚨 Safety Tips
- Wear gloves to protect your hands.
- Only use lubricants made for pressure washers.
- Keep oil away from your eyes and mouth.
7- Check for Leaks
Keeping your pressure washer in good shape means checking for leaks often. Leaks can waste water, lower pressure, and damage your machine. Let’s learn how to find and fix leaks easily!
🧐 What Parts Should You Check for Leaks? – Pressure Washer Maintenance
Look closely at these parts:
- 🧰 Pump – The part that pushes water out.
- 🧪 Hoses – The long tubes that carry water.
- 🛠️ Connections – Where hoses and nozzles attach.
❓ Why Check for Leaks?
- ✅ Saves Water – Stops water from being wasted.
- ✅ Keeps Pressure Strong – So your machine sprays hard.
- ✅ Prevents Damage – Stops small problems from getting worse.
🛎️ How to Find Leaks
- Turn on the Pressure Washer – Without squeezing the trigger.
- Look Closely – Check for water dripping from the pump, hoses, or connections.
- Listen for Hissing Sounds – Air or water leaks can make a hissing noise.
- Feel for Wet Spots – Run your hand (carefully) along hoses to check for water.
🔧 How to Fix Leaks
- 💧 Tighten Loose Connections – Use a wrench to stop leaks from joints.
- 🧰 Replace Damaged Hoses – If you see cracks or holes, get a new hose.
- 🛢️ Seal Small Leaks – Use waterproof tape for tiny hose leaks.
- ⚙️ Fix Pump Seals – If the pump leaks, replace worn-out seals or O-rings.
🗓️ When Should You Check for Leaks?
- 🛎️ Before Every Use – Quick check before you start.
- 🧹 After Cleaning – Look for leaks when putting the machine away.
- 🧰 If Pressure Drops – Low pressure could mean a leak.
🚨 Safety Tips
- Turn off the machine before fixing leaks.
- Wear gloves and stay dry when checking for leaks.
- Never use a damaged hose—it can burst under pressure!
8- Clean the Pump
Cleaning your pressure washer pump after each use is super important! It helps your machine last longer and keeps it working strong. Let’s learn how to clean it step-by-step!
🛠️ What is the Pump? – Pressure Washer Maintenance
The pump is the part of your pressure washer that pushes water out with power. Consider it the driving force behind your machine.
❓ Why Clean the Pump?
- ✅ Removes Dirt and Debris – Keeps the inside clean.
- ✅ Prevents Rust – Stops water from damaging parts.
- ✅ Helps It Last Longer – Keeps your pressure washer working well.
🧼 What You’ll Need
- 🪣 Clean water
- 🧰 Garden hose
- 🧤 Gloves (for safety)
🛎️ How to Clean the Pump (Step-by-Step)
- Turn Off the Machine – Unplug it and stop the water.
- Disconnect the Hose and Spray Gun – Take them off the pump.
- Flush with Clean Water –
- Connect a garden hose to the pump.
- Run clean water through it for 1–2 minutes.
- Drain All Water – Let the water flow out completely.
- Wipe the Outside – Use a cloth to clean the pump.
- Store It Safely – Keep your machine in a dry place.
🗓️ When Should You Clean the Pump?
- ✅ After Every Use – Always clean the pump after you finish using the pressure washer.
- ✅ Before Storing for a Long Time – Clean it well before putting it away for winter.
🚨 Safety Tips
- Turn off the power before you clean.
- Wear gloves to protect your hands.
- Don’t use soap or chemicals unless the manual says so.
Ensure your high-pressure pump operates at peak efficiency by scheduling a professional inspection and maintenance today.
9- Store Properly
Taking care of your pressure washer doesn’t stop after using it. You should store it the right way to keep it safe from weather and pests. Discover the best practices for easy and efficient storage.
🛠️ Why Store Your Pressure Washer Properly? – Pressure Washer Maintenance
- ✅ Prevents Rust – Keeps metal parts from getting damaged.
- ✅ Stops Pests – Mice and bugs can chew wires or build nests.
- ✅ Keeps It Ready to Use – So it works well next time.
📦 Where Should You Store It?
- 🏠 A Clean, Dry Place – Like a garage, shed, or storage room.
- 🌞 Away from Sunlight – The sun can damage plastic parts.
- 🚫 Off the Ground – Use a shelf or pallet to keep it dry.
🧼 How to Store Your Pressure Washer (Step-by-Step)
- Turn Off and Unplug – Make sure it’s off and safe.
- Drain All Water – Run the machine without the hose for a few seconds to empty water.
- Clean the Pump – Flush it with clean water (see our pump cleaning guide!).
- Wrap the Hose Neatly – Coil it up to avoid kinks.
- Cover the Machine – Use a cloth or plastic cover to keep dust away.
- Check for Pests – Seal any openings where bugs or mice could enter.
🗓️ When Should You Store It Carefully?
- ✅ After Every Use – Keep it stored safely between jobs.
- ✅ Before Winter – Cold weather can freeze and crack parts.
🚨 Safety Tips
- Store it out of reach of kids.
- Never store it with water inside—it can freeze and break parts.
- Use a fuel stabilizer if your pressure washer has a gas engine.
10- Inspect the Fuel System (Gas Models)
If you have a gas-powered pressure washer, it’s important to check the fuel system before storing it. This keeps your machine safe and ready to use next time. Let’s learn how to do it step-by-step!
🛠️ What is the Fuel System? – Pressure Washer Maintenance
The fuel system includes all the parts that carry gas to your pressure washer’s engine. This includes:
- ⛽ Fuel Tank – Holds the gas.
- 🧵 Fuel Lines – Hoses that carry the gas.
- ⚙️ Carburetor – Mixes gas with air to power the engine.
❓ Why Inspect the Fuel System?
- ✅ Prevents Leaks – Stops gas from dripping.
- ✅ Avoids Engine Problems – Keeps the engine running smoothly.
- ✅ Saves Money – Fixing small problems early is cheaper.
🛎️ How to Inspect the Fuel System (Step-by-Step)
- Turn Off the Machine – Let the engine cool down.
- Check the Fuel Tank –
- Look for cracks or rust.
- Make sure the gas cap is tight.
- Inspect the Fuel Lines –
- Feel for soft or cracked hoses.
- Replace any damaged lines.
- Look at the Carburetor –
- Check for leaks or dirt.
- Clean it if needed.
- Empty or Stabilize the Fuel –
- Short-term storage (less than 30 days): Add a fuel stabilizer.
- Long-term storage: Drain the gas completely.
🗓️ When Should You Inspect the Fuel System?
- ✅ Before Storing for Winter – Old gas can clog parts.
- ✅ After Long Breaks – If the pressure washer has been unused for several months.
- ✅ If You Smell Gas – Immediately inspect for any leaks.
🚨 Safety Tips
- Store your pressure washer away from flames or heat.
- Use a funnel to avoid spilling gas.
- Always wear gloves when handling fuel.
Seasonal Maintenance
11- Winterize the Pressure Washer – Protect It from the Cold
If you live in a cold place, you should winterize your pressure washer before storing it. Cold weather can freeze water inside the pump and hoses, which can cause cracks. Let’s learn how to protect your machine step-by-step!
🥶 What Does Winterize Mean? – Pressure Washer Maintenance
Winterizing means getting your pressure washer ready for winter by removing all water and protecting its parts from freezing.
❓ Why Winterize Your Pressure Washer?
- ✅ Prevents Freezing – Ice inside can crack parts.
- ✅ Saves Money – Fixing a broken pump is expensive.
- ✅ Keeps It Ready for Spring – Start using it quickly when the weather warms up.
🛎️ How to Winterize Your Pressure Washer (Step-by-Step)
- Turn Off and Unplug – Make sure it’s off and safe.
- Drain All Water from the Hoses:
- Disconnect the hoses and spray gun.
- Let the water run out completely.
- Empty the Pump:
- Start the pressure washer for 2–3 seconds without water.
- This pushes out any leftover water inside.
- Use Pump Saver (Optional):
- Spray pump saver fluid into the pump to stop rust.
- Coil and Store Hoses Properly:
- Wrap hoses neatly to prevent kinks.
- Store in a Warm, Dry Place:
- Keep your pressure washer indoors, like in a garage or basement.
🗓️ When Should You Winterize?
- ✅ Before the First Freeze – Act before the cold sets in!
- ✅ If You Won’t Use It for Months – Ensure proper protection during extended periods of inactivity.
🚨 Safety Tips:
- Don’t store your machine outside in the snow or rain.
- Wear gloves to keep your hands warm and safe.
- Follow the manual for your pressure washer model.
12- Replace Spark Plugs – Pressure Washer (Gas Models)
If you have a gas-powered pressure washer, you should inspect and replace the spark plugs every year. Spark plugs help the engine start and run smoothly. Let’s learn how to do this step-by-step!
⚙️ What is a Spark Plug? – Pressure Washer Maintenance
A spark plug is a small part in the engine that creates a spark to start the motor. Without it, your pressure washer will not operate.
❓ Why Replace the Spark Plugs?
- ✅ Starts the Engine Quickly – No more trouble starting.
- ✅ Keeps the Engine Strong – Ensures smooth operation.
- ✅ Prevents Breakdowns – Stops problems before they happen.
- ✅ Saves Money – Replacing a spark plug is cheaper than fixing the engine.
🛎️ How Often Should You Replace Spark Plugs?
- 🗓️ Every Year – Even if they look fine.
- 🛠️ After 100 Hours of Use – If you use your washer a lot.
- 🚨 If the Engine is Hard to Start – It might be time for a new spark plug.
🧰 What You’ll Need:
- 🧤 Gloves (for safety)
- 🪛 Spark plug wrench or socket wrench
- 🆕 New spark plug (check your manual for the correct type)
- 🧹 Small brush or cloth (for cleaning)
🛎️ How to Replace the Spark Plug (Step-by-Step):
- Turn Off the Engine – Let it cool completely.
- Remove the Spark Plug Wire – Gently pull the wire off the plug.
- Unscrew the Old Spark Plug – Use a wrench to twist and remove it.
- Check the Old Spark Plug:
- If it’s black, cracked, or rusty, it’s bad.
- Install the New Spark Plug:
- Screw it in tightly (but not too tight!).
- Reconnect the Spark Plug Wire:
- Push the wire back onto the plug.
- Start the Engine:
- Make sure it runs smoothly.
🚨 Safety Tips:
- Avoid working on the engine while it is hot.
- Use the correct spark plug (check your manual).
- Dispose of old spark plugs properly.
13- Check the Air Filter – Pressure Washer (Gas Models)
If you have a gas-powered pressure washer, you should check the air filter regularly. The air filter keeps dirt and dust out of the engine. Let’s learn how to check it step-by-step!
🛠️ What is an Air Filter? – Pressure Washer Maintenance
The air filter is a part of the engine that cleans the air before it enters. It stops dirt and dust from damaging the engine.
❓ Why Check the Air Filter?
- ✅ Keeps the Engine Clean – Stops dirt from getting inside.
- ✅ Helps the Engine Run Smoothly – Provides clean air for better performance.
- ✅ Saves Fuel – A clean filter helps the engine use less gas.
- ✅ Prevents Engine Damage – Dirty filters can cause breakdowns.
🛎️ How Often Should You Check the Air Filter?
- 🗓️ Before Each Use – Quick check for dirt or damage.
- 🧹 After 25 Hours of Use – Clean the filter.
- 🆕 Replace Annually – Or sooner if it looks dirty.
🧰 What You’ll Need:
- 🧤 Gloves (for safety)
- 🪛 Screwdriver (if needed)
- 🧹 Soft brush or cloth
- 🆕 New air filter (if replacing)
🛎️ How to Check the Air Filter (Step-by-Step):
- Turn Off the Engine: – Let it cool before you start.
- Find the Air Filter Cover: – It’s usually on the side of the engine.
- Open the Cover: – Use a screwdriver if needed.
- Take Out the Air Filter: – Carefully remove it.
- Inspect the Filter:
- 🟢 Looks Clean: Light dust is okay.
- 🟡 Looks Dirty: Now is the appropriate time to clean it thoroughly.
- 🔴 Looks Torn or Black: Replace it immediately.
- Clean or Replace:
- Foam Filter: Wash with soap and water, then dry.
- Paper Filter: Tap it gently to remove dust. If dirty, replace it.
- Put the Filter Back: – Reinstall the filter and close the cover.
🚨 Safety Tips:
- Always turn off the engine before checking the air filter.
- Never use a damaged air filter—it can ruin the engine.
- Use only the type of filter recommended by your pressure washer’s manual.
14- Inspect the Pump Seals
The pump seals in your pressure washer keep water from leaking. Over time, they can wear out. Checking and replacing them helps your machine stay strong. Let’s learn how to do it step-by-step!
🛠️ What Are Pump Seals? – Pressure Washer Maintenance
Pump seals are rubber rings inside the pump. They stop water from leaking out when the pump pushes water through the hoses.
❓ Why Inspect the Pump Seals?
- ✅ Stops Leaks – It retains water within the pump.
- ✅ Prevents Damage – Protects the pump from breaking.
- ✅ Saves Money – Fixing seals is cheaper than replacing the pump.
- ✅ Keeps Pressure Strong – No leaks mean full power.
🛎️ How Often Should You Inspect the Pump Seals?
- 🗓️ Every 3 Months – For regular users.
- 🧹 After Heavy Use – If you’ve used it a lot.
- 🚨 If You See Leaks – Immediately inspect the pump for any water leaks.
🧰 What You’ll Need:
- 🧤 Gloves (for safety)
- 🪛 Screwdriver or wrench
- 🆕 New pump seals (check your manual for the right type)
- 🧹 Clean cloth
🛎️ How to Inspect the Pump Seals (Step-by-Step):
- Turn Off and Unplug: – Make sure the machine is off and cool.
- Find the Pump Housing: – It’s the part where the water hose connects.
- Open the Pump Cover: – Use a screwdriver or wrench to remove the cover.
- Check the Seals: – Look closely at the rubber rings.
- 🟢 Good: The seals are smooth and supple.
- 🟡 Worn: Visible cracks or hardened spots.
- 🔴 Bad: Torn or broken seals.
- Replace Damaged Seals:
- Take out the old seals.
- Clean the area with a cloth.
- Put in new seals.
- Close the Pump: – Screw the cover back on tightly.
🚨 Safety Tips:
- Wear gloves to protect your hands from dirt and grease.
- Only use the correct seals for your pressure washer model.
- Avoid overtightening the pump cover, as it may crack.
After Each Use
15- Flush with Clean Water
After using your pressure washer, it’s important to flush it with clean water. This removes leftover soap and dirt, helping your machine last longer. Let’s learn how to do it step-by-step!
💧 What is Flushing?
Flushing means running clean water through the pressure washer to clean out soap, dirt, and debris from inside the system.
❓ Why Flush with Clean Water? – Pressure Washer Maintenance
- ✅ Removes Soap Buildup – Clears out leftover detergent.
- ✅ Prevents Clogs – Stops dirt from blocking the hoses.
- ✅ Protects the Pump – Keeps it from getting damaged.
- ✅ Keeps It Ready for Next Use – So it works perfectly next time.
🛎️ When Should You Flush the System?
- 🧽 After Every Use – Especially after using soap or chemicals.
- 🧹 Before Storing It – Keeps the inside clean and fresh.
- 🚨 If Pressure Feels Low – Flushing can remove blockages.
🧰 What You’ll Need:
- 🧤 Gloves (for safety)
- 💧 Clean water (from a hose)
- 🧰 Pressure washer manual (for model-specific tips)
🛎️ How to Flush with Clean Water (Step-by-Step):
- Turn Off the Pressure Washer: – Unplug it if it’s electric.
- Remove the Soap Tube: – If you used soap, take the tube out of the detergent bottle.
- Connect a Clean Water Source: – Hook your garden hose to the pressure washer.
- Run Water Through the System:
- Squeeze the Spray Gun Trigger for 1–2 minutes.
- Make sure clear water comes out (no bubbles or soap).
- Flush the Hoses and Nozzle: – Spray for a few seconds without the nozzle tip.
- Turn Off and Drain: – Switch off the machine and let any leftover water drain out.
🚨 Safety Tips:
- Use only clean, cold water—hot water can damage the pump.
- Never run the pressure washer without water—it can overheat the pump.
- Wear gloves to keep your hands safe from splashes.
16- Inspect the Gun and Wand
The gun and wand are important parts of your pressure washer. You hold them to spray water and clean surfaces. Checking them for damage keep your machine safe and strong. Let’s learn how to do it step-by-step!
🛠️ What Are the Gun and Wand?
- Gun – The handle with a trigger you squeeze to spray water.
- Wand – The long tube that connects the gun to the nozzle.
❓ Why Inspect the Gun and Wand?
- ✅ Prevents Leaks – Fixes cracks before they get worse.
- ✅ Keeps Water Pressure Strong – No broken parts mean full power.
- ✅ Stops Accidents – Broken parts can cause water to spray dangerously.
- ✅ Saves Money – Fixing small problems early is cheaper.
🛎️ When Should You Inspect Them?
- 🧹 Before Each Use – A quick check for cracks or leaks.
- 🗓️ Every Month – A detailed inspection for wear and tear.
- 🚨 If You Drop the Gun or Wand – Check immediately for damage.
🧰 What You’ll Need:
- 🧤 Gloves (for safety)
- 🪛 Wrench (Tighten the parts as necessary.)
- 🧹 Cloth (to clean off dirt)
- 🆕 New parts (if replacing damaged pieces)
🛎️ How to Inspect the Gun and Wand (Step-by-Step):
- Turn Off the Machine: – Make sure it’s unplugged and safe.
- Check the Gun Handle: –
- Look for cracks or leaks.
- Squeeze the trigger to make sure it moves smoothly.
- Inspect the Wand: –
- Look for dents or rust.
- Check if the nozzle is tight.
- Look at the Hose Connection: –
- Make sure the hose fits tightly with no leaks.
- Test for Leaks: –
- Turn on the water (without starting the engine) and check for drips.
- Replace Damaged Parts: –
- Change cracked wands or worn-out seals.
🚨 Safety Tips:
- Never use a wand with cracks—it can burst under pressure.
- Replace any worn-out seals to prevent leaks.
- Always follow your pressure washer manual for part replacements.
17- Dry the Equipment
After using your pressure washer, it’s important to dry it properly. This helps prevent rust and corrosion, which can damage your machine over time Let’s learn how to do it step-by-step!
💧 What Does Drying the Equipment Mean?
Drying means using a cloth or towel to wipe off all water from your pressure washer after you finish using it.
❓ Why Should You Dry Your Pressure Washer?
- ✅ Prevents Rust: Water can cause metal parts to rust.
- ✅ Stops Corrosion: Keeps the pump and engine safe.
- ✅ Keeps It Clean: Removes dirt and water spots.
- ✅ Helps It Last Longer: Protects the machine from damage.
🛎️ When Should You Dry the Equipment?
- 🧹 After Every Use: Always dry it before storing.
- 🧰 Before Storing for a Long Time: Make sure it’s completely dry.
- 🚨 If It Gets Wet in the Rain: Dry it promptly to prevent any damage.
🧰 What You’ll Need:
- 🧤 Gloves (to keep hands clean)
- 🧽 Soft cloth or microfiber towel
- 🧹 Small brush (for hard-to-reach spots)
- 🧢 Air blower (optional, for quick drying)
🛎️ How to Dry the Equipment (Step-by-Step):
- Turn Off and Unplug: – Make sure the machine is safe.
- Drain Leftover Water: – Run the pump for 2 seconds without water to clear any drops inside.
- Wipe the Outside: – Use a soft cloth to dry the frame, pump, and hoses.
- Dry the Gun and Wand: – Wipe them down and check for any water in the nozzle.
- Check the Wheels and Frame: – Dry any water stuck under or around the wheels.
- Let It Air Out: – Leave the machine in a dry spot for 5–10 minutes to air-dry fully.
🚨 Safety Tips:
- Don’t use a wet machine—it can cause electric shocks.
- Never store your pressure washer while it’s damp.
- Keep it out of direct sunlight to avoid damage to plastic parts.
18- Check the Pressure Settings
Before using your pressure washer, it’s important to check the pressure settings. Using the right pressure helps you clean better and protects your machine from damage. Let’s learn how to do it step-by-step!
🛠️ What Are Pressure Settings?
Pressure settings control how hard the water sprays out of your pressure washer. The system measures them in PSI (pounds per square inch).
❓ Why Check the Pressure Settings?
- ✅ Protects Your Machine: Lowers the strain on the pump.
- ✅ Cleans Better: Uses the right power for different surfaces.
- ✅ Prevents Damage: Too much pressure can break delicate surfaces.
- ✅ Saves Water: You use only the necessary amount of power.
🛎️ When Should You Check the Pressure Settings?
- 🧹 Before Each Use: Always check before cleaning.
- 🚨 When Changing Surfaces: Use different settings for different jobs.
- 🧰 If the Pressure Feels Weak: You may need to adjust the settings.
🧰 What You’ll Need:
- 🧤 Gloves (for safety)
- 🪛 User manual (to find recommended settings)
- 🧪 Different nozzles for different pressure levels
🛎️ How to Check Pressure Settings (Step-by-Step):
- Turn On the Pressure Washer: – Let it warm up for a few seconds.
- Adjust the Pressure: – Use the pressure control knob or dial (check your manual).
- Choose the Right Nozzle: – Nozzles control how strong the water sprays:
- 🟢 Green (25°): For driveways and decks.
- ⚪ White (40°): For cars and windows.
- 🟡 Yellow (15°): For tough stains and concrete.
- 🔴 Red (0°): For heavy-duty cleaning (use with care).
- Test the Spray: – Spray on a small area to check if the pressure is right.
- Adjust if Needed: – Lower the pressure for delicate surfaces.
🚨 Safety Tips:
- Never use high pressure on windows or soft wood—it can break or damage them.
- Start with low pressure and increase slowly if needed.
- Wear safety glasses to protect your eyes from splashes.
Preventive Maintenance
19- Use the Right Detergents
Using the right detergent is important for your pressure washer. It helps you clean better and keeps your machine safe from damage. Let’s learn how to choose and use detergents step-by-step!
🧼 What Are Pressure Washer Detergents?
These are special soaps made to work with pressure washers. They help remove dirt, grease, and stains without harming your machine.
❓ Why Use the Right Detergents?
- ✅ Protects the Pump: The wrong soaps can clog or damage the pump.
- ✅ Keeps Seals Safe: Harsh chemicals can break the rubber seals.
- ✅ Cleans Better: Manufacturers make special detergents for different surfaces.
- ✅ Saves Money: Protecting your machine means fewer repairs.
🛎️ When Should You Use Detergents?
- 🧹 When Cleaning Tough Stains: Like oil, mold, or grease.
- 🏡 For huge Areas: Like driveways, patios, or siding.
- 🚗 On Vehicles: For cars, boats, and RVs (with low-pressure soap settings).
🧰 What You’ll Need:
- 🧤 Gloves (for safety)
- 🧼 Manufacturer-approved detergent
- 🧪 Soap nozzle (usually black for pressure washers)
- 🪣 Soap tank or detergent injector
🛎️ How to Use the Right Detergents (Step-by-Step):
- Check Your Manual: – Learn which detergents are safe for your machine.
- Choose the Right Detergent: – Pick one made for your cleaning job:
- 🧼 Car Wash Soap: Gentle for vehicles.
- 🏡 House Cleaner: For siding and brick.
- 🧪 Concrete Cleaner: For driveways and patios.
- Fill the Soap Tank: – Pour the detergent into the soap tank or injector.
- Attach the Soap Nozzle: – Use the low-pressure (black) nozzle for detergent.
- Spray and Soak: – Cover the area with soap and let it sit for a few minutes.
- Rinse with Clean Water: – Switch to a high-pressure nozzle and rinse thoroughly.
🚨 Safety Tips:
- Never use bleach—it can ruin your pump and seals.
- Avoid using dish soap or car shampoo not made for pressure washers.
- Rinse the machine after using soap to prevent clogs.
20- Follow the Manufacturer’s Guidelines
To keep your pressure washer running well, always follow the manufacturer’s guidelines. The user manual has everything you need to know about caring for your machine. Let’s learn why and how to do it step-by-step!
📘 What Are the Manufacturer’s Guidelines?
The manufacturer’s guidelines are instructions found in the user manual. They tell you:
- 🛠️ How to use the machine correctly.
- 🧼 How to clean and maintain it.
- 🗓️ Determine the appropriate time to replace parts or change the oil.
Explore our premium Hawk high-pressure pumps, proudly made in Italy, for unmatched performance and durability in all your cleaning needs.
❓ Why Follow the Manufacturer’s Guidelines?
- ✅ Keeps Your Machine Healthy: Follow the right steps to avoid damage.
- ✅ Prevents Accidents: Safe use means fewer mistakes.
- ✅ Saves Money: Proper care stops expensive repairs.
- ✅ Keeps Warranty Valid: Not following the manual can void your warranty.
🛎️ When Should You Check the Manual?
- 🧰 Before First Use: Learn how to use it safely.
- 🧽 Before Cleaning Different Surfaces: Find the right pressure settings.
- 🛠️ Before Maintenance: Know when to change oil, filters, or seals.
- 🚨 If Something Goes Wrong: Check the troubleshooting tips.
🧰 What You’ll Find in the Manual:
- 🗓️ Maintenance Schedule: When to change oil, spark plugs, and filters.
- ⚙️ Parts List: Which nozzles, hoses, and seals to use.
- 💧 Detergent Guide: Which soaps are safe for use?
- 🚨 Safety Rules: How to avoid accidents.
🛎️ How to Follow the Guidelines (Step-by-Step):
- Read the Manual Carefully: – Highlight important sections.
- Follow the Pressure Washer Maintenance Schedule: – Mark it on your calendar.
- Use the Right Parts: – Only buy parts the manual recommends.
- Keep the Manual Safe: – Store it somewhere easy to find.
- Check Online: – Many brands have digital manuals if you lose yours.
🚨 Safety Tips:
- Refer to the manual for precise guidance if you are uncertain.
- Follow the recommended pressure settings to avoid damage.
- Use only approved detergents and oils.
Follow these tips to extend the life of your pressure washer and ensure it operates safely and efficiently.
Check out our pressure washers for reliable and efficient cleaning solutions.